Archaeology for Fun and Profit
a foray into the Forgotten Academy for 4 to 6 Level 1 Adventurers
This adventure is the first introduction to the exploration - and exploitation - of the Forgotten Academy, a mega-dungeon built in response to the #Dungeon23 Challenge dreamed up by Sean McCoy. Eager but inexperienced Adventurers have been hired to locate and investigate the fabled Forgotten Academy. An institution which, according to legend, attracted the best and brightest practitioners of the magical arts long ago - before the Great Strife, but which has been all but forgotten in the two thousands years since. Imagine the treasures that must surely be lying there, just waiting for somebody to uncover and retrieve them!
Adventuring parties are free to explore the Academy in whatever sequence they wish. The only "railroading" is in the introductory portions of the adventure: Arrival at the Camp, and the first look around offered in Exploring the Grounds. From that point on, the party is free to choose their point of entry and can go wherever they wish in whatever order they wish. There are a few instances where they'll need to find keys or other items in order to get into new areas, but otherwise, there is no set order other than what's defined by the maps themselves.
The remainder of this text is for Gamemaster eyes only!
Stop here if you are a Player.
The Adventurers arrive in the evening; Marquis Spikeberry greets them with excitement and cheer in his voice. He eagerly describes all the hard work "he did" in getting this expedition set up. He rapidly explains that his scouts have, finally, he thinks, located the famed Academy.
The Marquis should carry on about the historical importance of the work the Adventurers will be doing, but is should also become clear that "historical exploration" really means "bring back as many ancient treasures as you can carry". The party should be informed that their "pay" will consist of the coin that the Marquis will pay for these treasures. The adventurers are free to keep a few trinkets for themselves, but surely they don't want the hassle of arranging transport back to civilization of all the bulky items they surely will find waiting for them. In short, this "archaeological expedition" is being conducted in a manner that the Imperial/Victorian British would have been proud of in our world.
If asked how long the expedition has been going on, the Marquis will avoid answering directly, babbling something about how long it took to get all the necessaries - including the adventurers - into camp. He will go out of his way to make it sound like the scouts have literally just discovered the Academy, and that the Adventurers will be the first group to actually explore the ruins. Under no circumstances will he tell the party that they're not the first, or that the three groups of Adventurers that preceded them haven't been heard from since they went into the ruins.
If the party presses for information that the Marquis doesn't want to provide, he will remind them of the long day they'll have tomorrow and suggest they get settled and rested. He'll then scurry off on some "important errand". The adventurers are brought to a large tent which contains simple beds for each, and a large, locked chest in which they can keep their spare gear. Keys sit in the locks of these chests, and the party is assured their belongings will be safe there while they're out adventuring. They then have the opportunity to briefly explore the camp to see what's available, and probably visit the "tavern" to meet a few of the camp folks.
Wyrdswyrth Spikeberry
Tarnula Flintchipper, a female Dwarven blacksmith who can repair weapons and metal armor; also capable of magical runework if the party needs this in the future.
Rudolf and Shanna Fairbairn - a husband/wife Halfling team that runs the tavern. (Rudolf cooks; Shanna deals with the customers)
Ka'aghra - a female Orc warrior, head of camp security and coordinator of the various teamsters
Teamster/Laborers:
Barnabas Godfrey (human)
Gransh Amaricson (half-orc)
Nicholas Clithrow (human)
Slipshingle (goblin)
Rulgor Blackhelm (dwarf)
Anna Glennon (human)
Helene Ballett (human)
Alrionar Anselric - half-elven bard/entertainer
Cricktwo Longwhisker - ratfolk scout who found the Academy
Belgridane Cooligrood - gnomish shopkeeper/merchant running the provisioning tent
Gregory Elantior - half-elven butler/servant of Marquis Spikeberry
As they meet and chat with the inhabitants of the camp, an occasional slip of the tongue about "the last group" should get out. But when pressed, all will insist that the Adventurers are the only group that responded to the job search. (A highly perceptive party member might be able to tell that they're hiding something.)
The general appearance should be that it's been a long time since anybody has been here, but a perception (WIS) check at DC15 will reveal that there are some bootprints in a dried muddy spot near the entrance, and those bootprints are larger than their ratfolk guide would have been capable of making.
If the party continues to explore the grounds and circles around to the back of the main hall, they will have to circle past at least one of the towers. Their descriptions are, at this point, essentially identical.
For one-shot purposes, the windows in the towers are shaped like arrow slits; their sills are too sloped, and the windows themselves are too narrow to be used as entry points.
Once they get to the back of the main hall...
And if they walk around the Kitchen building to its back/western side...
The southeast door can be forced open, but only after spending considerable effort clearing the stone and rotting wood debris away from it.
The northeast door can be forced open with relative ease after no more than a few minutes of clearing away some wood debris.
The large gap in the northwest wall can simply be walked through.
The open door in the center of the Main Hall's east wall is the only ground-level entrance.
The stained glass window in the Main Hall's east wall is 20' (6m) above ground and 20' (6m) in diameter. It has a 1' (30cm) ledge, and the glass can be easily broken and the lead frameworks pushed in.
Two large openings in the Main Hall's west wall are 20' (4.5m) above the ground. A rope with grappling hook will eventually catch, though it may take a few tosses.
There are 36 windows in the Dormitory Tower and the same number in the Library Tower. Some of these are easily reachable via vines; others may require a more challenging climb. All have a 1' (30cm) ledge, and all can be easily broken. For one-shot purposes, these are narrow, arrow-slit type windows that will not allow passage even if broken.
The Rookery Turret appears to be open at the top; birds can be seen coming and going. But that opening is 80' (24m) up. A rope cannot be thrown that high. For one-shot purposes, the top of the rookery tower is not reachable.
Let the party decide how they wish to gain access, then select one of the following links to proceed:Entering the Main Hall Through the Doors
Entering the Main Hall Through the Stained Glass Window
Entering the northern 2nd floor opening in the western wall near the kitchens
Entering the southern 2nd floor opening in the western wall near the kitchens
Exploring the Kitchens
The shortsword, shortbow, and dagger are unremarkable and nonmagical, but perfectly functional. They haven't been here long enough to develop any rust. The spiders have long ago dealt with anything edible in the backpacks, but there are still a few items remaining: a Flint & Steel, a whetstone, 6 pieces of chalk, a small, slightly rusted, but safe to use, grappling hook, 6 candles bound with twine, and an item that resembles a thick stick about a foot long with a metal cap slid over one end. This is a Perpetual Torch. There are also many glass shards, as if flasks had broken. In fact, an oily film covers the items in the pack that held the whetstone.
The coccoons hold the dessicated husks of the four adventurers who used to own the weapons and backpack. They're still wearing their bits of leather armor, and one still has a quiver with 12 arrows slung over its shoulder. Each also has a belt pouch containing coins: a total of 17gp, 32sp, and 29cp can be retrieved.
The statues, and all of their component bits (tomes, wands, staff, etc.) are sculpted marble; there is no loot to be had from them, unless the party tries to cart them off whole!
From here, the party can take the , enter the , , , or go up the ornate stairways to the . They can also
A drawer is stuck, but forcing it will reveal eight special items: Visitor's Badges.
Also in the drawer are small placards that include a simple instruction: "To visit Headmaster, step into entry and announce yourself."
From here, the party can only return to the .
From here, the party can either go into the or the . They could also go through the archway to .
From here, the party can either go into the or the . They could also go through the archway to .
This door leads into the . Otherwise, the party can return to either the or the .
This door leads into the . Otherwise, the party can return to either the or the .
The podium and blackboard wall are magically linked. If a person stands at the podium and speaks while touching it, a white stick of chalk will appear and begin scratching out whatever is being spoken - complete with the clacking and agonizing screeches of chalk squeaking across the slate - but the clacking and squeaking don't always seem to coincide with the appearance of words and letters on the blackboard. The writing is enchanted as well; everyone who views it will see it written in whatever their "first language" was. True Sight will reveal that the marks are actually some unknown runic language.
If the podium is removed, the magical link between it and the blackboard will be broken. There is nothing else of value in the classroom.
From here, the party can either or attempt to .
The silk and silver talisman is a Talisman of Peaceful Repose. The vial in the hands of the skeleton once held a powerful poison, though no traces remain. (This was the suicide poison used by Donovar Spangrove centuries ago.
The gold pendant is about 4" (10cm) in diameter; it bears the same tongue-of-flame symbols that was seen over the classroom door. The pendant radiates magic; this is a Faculty Badge which identifies its wearer as a member of the Academy Staff for purposes of bypassing the many wards and magical protections in the complex.
Opening the chest (after picking the lock), reveals piles of rotted cloth and leather that were once articles of clothing. A cracked leather pouch containing 17gp, 27sp, and 8cp is hidden beneath the clothing piles. The silver coins are tarnished black, and the copper coins have oxidized so badly that they crumble when the coins are emptied from the pouch.
From here, the party can only . A party member possessing the Evocation Faculty Badge can stand on the circle near the fireplace and be instantly teleported to the on the second floor, along with anyone they happen to be touching.
This was the Alchemy Lecture Hall. The glassware is what remains of the display of distillers, retorts, condensers, flasks, and other exotic equipment of a skilled alchemist. The podium and slate wall are magically linked (see description of Evocation Lecture Hall). The tracks in the dust are far too tiny to have been made by any of the folk, but they aren't animal tracks either. A character knowledgeable about Fey creatures has a chance to identify them as some sort of small Gremlin tracks, though identifying a particular species of Gremlin is impossible.
There is nothing of value in this room.
From here, the party can either or attempt to
From here, the party can either go to the , or attempt to enter the . Alternatively, they could use the opening to return to the .
From here, the party can either go to the , or attempt to enter the . Alternatively, they could use the opening to return to the .
If the party enters via either door in the Gathering Hall, or if they have Faculty Badges and enter from the passages...
From here, the party could use the doors to enter the , or they could enter either the or . Alternatively, if they have the appropriate Faculty Badges, they could teleport to either or .
From here, the party can return to the , or they can use either door to enter the (even if they do not possess any faculty badges).
This is the Academy Custodian's closet, used to house various cleaning and repair implements required of that profession. The small chest contains a number of keys made of an alloy that apparently resisted rust or tarnish; they are all in quite good shape. They do not emit any sort of magical auras. The chest itself is locked, but the lock can be picked normally. Alternatively, a solid blow to the chest will break it open. (The keys do not open anything in the one-shot area, but they are needed to access portions of the restricted section in the library, as well as various rooms in the lower levels of the Academy.)
From here, the party can only return to the
From here, the party can descend to the , or ascend . They can also return to the .
From here, the party can descend to the , or .
From here, the party can at the east end of the corridor, take the or use the .
From here, the party can at the east end of the passage, use to the or select the .
From here, the party can enter the , or the . Alternatively, they can examine the .
From here, the party can enter the , or the . Alternatively, they can .
Once the alcove has spun around, a character can explore the . If they stay in the alcove and somebody else knocks from outside, or if they knock on the wall themselves, they'll spin back to the .
A Perception check will allow somebody to remember seeing an identical copy of one of these portraits in the Visitor's Reception area (if they visited there). The globes contain pebbles that had Continual Light cast upon them centuries ago. The magic is fading, but not gone completely. The skulls are unremarkable. The inkwell contains nothing but solid residue; the quills crumble to dust when touched. The portraits are of the various headmasters of the Academy during its history.
The desk contains a drawer in which 12 Student Talismans can be found.
From here one can either return to the or explore the .
Perusing the titles of the books, adventures will find many scripts and languages they do not understand, thoush some are in commonspeech. Others are in Elvish, Dwarvish, Awkwan (birdfolk), and even Taxlatl (lizardfolk). A few are in a script that has been lost to the ages.
The gaps between the books are haphazard and do not appear to be a "decorating decision". It's as if a number of books were removed, leaving others behind. Anyone with formal magical training can make a Perception check to notice that while all sorts of magical subjects are covered by the books remaining, there are no titles related to necromancy, and very few or summoning.
There is one book that faintly radiates a magical aura, and its is far better preserved than all the others, though the layers of dust and cobwebs will initially hide that fact. Even this book has been damaged in the past by bookworms, but it appers to have been a spellbook, and one spell: Thoughtful Gift remains intact.
From here adventures can return to the , or proceed through the door to the .
The wardrobe contains the rotted and tattered remains of a number of fine silk robes, some with embroideries of gold and silver thread in intricate patterns - much like those in the office portraits. None are salvageable, though. The dressing table is bare except for the shards of broken mirror. The blankets and bedsheets were also quite lavish in their time, but are now rotted and riddled with insect holes (once the dust is removed).
The garderobe (toilet) features a rotting wooden seating platform with a hole in it. The space below the hole radiates magic, and shining a light into the hole reveals only pitch blackness. This is a still-active portal to a pocket dimension that served as the refuse dump for the Academy; anything dropped into it will simply disappear without a sound.
From here, adventurers can only return to the
From here, the party can or .
From here, the party can or .
This was the Abjuration Lecture Hall, dedicated to the study of defensive magic. The good-condition shield on the wall is magical; it is a Medium Shield+1. The family crest on the shield is actually that of Marquis Spikeberry, who will pay handsomely for this artifact.
From here adventurers can return to the , or can enter
The main kitchen of the Academy is a relatively large space where staff prepared meals for the entire academy community. Ovens and roasting hearths lined the walls, and work tables filled much of the central part of the room. There are cellars beneath the floor that were used to store foodstuffs. A number of smaller wooden structures were once attached to the building's sides for storage as well, but these have long since rotted away.
The presence of a great deal of food at the time when catastrophe befell the Academy attracted wildlife. Though that original food supply is long gone, the room continues to be the lairing area for a colony of Giant Badgers.
If the party circles around to the back of the kitchen building...
Unless the party makes a lot of threatening sounding noise, they will not be attacked in the hallway, though they may begin to hear additional sounds of hissing and low-pitched growling.
From this hall, the party can either , or enter , , , or .
From here, the party can only .
From here, the party can only .
There are no traces remaining to suggest what the clay jars or barrels once held.
From here, the party can only .
Adventure Structure
The adventure is designed for a group of four to six Level 1 Adventurers. It is based on the "Old School Renaissance" principle that all adventures should "go out... deal with the obstacles... collect the loot... and get home!" within the timeframe of each gaming session. The Forgotten Academy is a mega-dungeon, consisting of well over 300 "rooms"; it cannot be explored in a single play session. But base camp isn't far away, so a party can explore for a day, then retreat to a safe space to recover resources and health before returning to tackle deeper and darker challenges.Adventuring parties are free to explore the Academy in whatever sequence they wish. The only "railroading" is in the introductory portions of the adventure: Arrival at the Camp, and the first look around offered in Exploring the Grounds. From that point on, the party is free to choose their point of entry and can go wherever they wish in whatever order they wish. There are a few instances where they'll need to find keys or other items in order to get into new areas, but otherwise, there is no set order other than what's defined by the maps themselves.
One-Shot Play
As a one-shot, this adventure represents Day 1 of the party's exploration. There are plenty of foes to overcome, and plenty of loot to recover, as well as a few secrets that the good Marquis wasn't aware of - and some that he certainly was! The Gamemaster should make clear that the party needs to return to the base camp before nightfall, where they can sell off whatever loot they have amassed to see how well they did.Game Systems
The adventure as presented here is written to be played with the Laurels and Loot TTRPG Rule System, a system which is still under development and undergoing playtesting. With very minor adjustments, however, it could easily be adapted for use with almost any fantasy TTRPG, including all versions of the most popular offerings from Wizards of the Coast and Paizo.The remainder of this text is for Gamemaster eyes only!
Stop here if you are a Player.
Arrival at the Camp
You have been hired by Marquis Wyrdswyrth Spikeberry, a noble in the Kingdom of Tyrnabay. He has been obsessed with locating the long-lost Academy, an institution where the most brilliant practitioners of the magical arts studied to enhance their skills. Few alive today have ever heard of this place - indeed you had not until you saw the bill posted in the city square in Wolf's Bay seeking Adventurers and promising adventure, and of course good pay!
After signing up, you boarded a ship which crossed Evermist Lake, anchoring off the western shores south of the Orclands. After being brought ashore by small boats, you and your gear were loaded onto one of several carts amid crates, sacks, and barrels of supplies destined for what the teamsters call "Base Camp". After 3 days of slow travel along a well-worn trail, you reached the camp. It is more like a small village, except that the usual buildings have been replaced by large pavilion-style tents. Smithies, provisioners, and even a tavern have been established.
The teamsters ignore you as they set to work unloading the carts, but a well dressed nobleman hurries over, smiling broadly and eagerly shouting out greetings as he approaches and offers handshakes to each of you. He identifies himself as Wyrdswyrth Spikeberry... the man in charge. Dressed in white silks and satins, it's pretty obvious that he doesn't do much work around the camp, and he certainly doesn't look like the Adventuring type.
The Adventurers arrive in the evening; Marquis Spikeberry greets them with excitement and cheer in his voice. He eagerly describes all the hard work "he did" in getting this expedition set up. He rapidly explains that his scouts have, finally, he thinks, located the famed Academy.
The Marquis should carry on about the historical importance of the work the Adventurers will be doing, but is should also become clear that "historical exploration" really means "bring back as many ancient treasures as you can carry". The party should be informed that their "pay" will consist of the coin that the Marquis will pay for these treasures. The adventurers are free to keep a few trinkets for themselves, but surely they don't want the hassle of arranging transport back to civilization of all the bulky items they surely will find waiting for them. In short, this "archaeological expedition" is being conducted in a manner that the Imperial/Victorian British would have been proud of in our world.
If asked how long the expedition has been going on, the Marquis will avoid answering directly, babbling something about how long it took to get all the necessaries - including the adventurers - into camp. He will go out of his way to make it sound like the scouts have literally just discovered the Academy, and that the Adventurers will be the first group to actually explore the ruins. Under no circumstances will he tell the party that they're not the first, or that the three groups of Adventurers that preceded them haven't been heard from since they went into the ruins.
If the party presses for information that the Marquis doesn't want to provide, he will remind them of the long day they'll have tomorrow and suggest they get settled and rested. He'll then scurry off on some "important errand". The adventurers are brought to a large tent which contains simple beds for each, and a large, locked chest in which they can keep their spare gear. Keys sit in the locks of these chests, and the party is assured their belongings will be safe there while they're out adventuring. They then have the opportunity to briefly explore the camp to see what's available, and probably visit the "tavern" to meet a few of the camp folks.
As they meet and chat with the inhabitants of the camp, an occasional slip of the tongue about "the last group" should get out. But when pressed, all will insist that the Adventurers are the only group that responded to the job search. (A highly perceptive party member might be able to tell that they're hiding something.)
First View of the Academy
You set out at first light after loading your packs with rations for the day and whatever supplies you think you need. Cricktwo Longwhisker, your Chittiki/ratfolk scout, leads you through the hilly wilderness throughout the morning, pointing out stone trail markers all along the way. "You'll need to follow those to get back to camp when you're done", Cricktwo explains.
It is late morning when you reach the top of a rise that is fairly devoid of trees. Looking down into the thickly forested valley to the west, you see a pair of stone turrets peeking out above the treetops, and can barely make out a shallow-pitched roof structure just at treetop height between them. Without a chance for you to respond, Cricktwo wishes you luck and immediately starts hurrying back the way he led you. His last, fading words as he disappears back into the trees are "I'm sure you'll have no trouble finding your way back! Just follow the markers!"
It is late morning when you reach the top of a rise that is fairly devoid of trees. Looking down into the thickly forested valley to the west, you see a pair of stone turrets peeking out above the treetops, and can barely make out a shallow-pitched roof structure just at treetop height between them. Without a chance for you to respond, Cricktwo wishes you luck and immediately starts hurrying back the way he led you. His last, fading words as he disappears back into the trees are "I'm sure you'll have no trouble finding your way back! Just follow the markers!"
Exploring the Grounds
The party should have no trouble finding their own way down into the forested valley where the towers loom.
As you get nearer, more and more of the massive stone structure becomes visible through the trees and brush. The building of weathered, dark stone is at least 60' (18m) tall, rising to the level of the treetops. It is about 80' (24m) across between the corner turrets, which are another 20' (6m) taller still. Thick vines snake their way up the sides of the buildings in a few places. The trees and underbrush of the forest have encroached right up to the walls of the buildings.
Attached to either side of the main structure are two huge, not-quite-circular ten-sided structures with one face adjoining the main building. These are not as tall as the main building - not tall enough to have cleared the treetops when viewed from the rise earlier - but are about 100' (30m) in diameter.
The main building has a large, ornate double door set in the center of a wall approximately 80' (24m) across. They are arch-shaped and made of iron-bound wood. Each door is 5' (1.5m) wide and about 10' (3m) tall at the top of the arch. One is slightly ajar - enough for one person to slip through. A huge, round stained-glass window - about 20' (6m) in diameter is set above the entrance. As you peer inside, you see nothing but darkness... and cobwebs. Sheets of them cover the space between the open door and its closed companion. They reach upward beyond the door frame.
The general appearance should be that it's been a long time since anybody has been here, but a perception (WIS) check at DC15 will reveal that there are some bootprints in a dried muddy spot near the entrance, and those bootprints are larger than their ratfolk guide would have been capable of making.
If the party continues to explore the grounds and circles around to the back of the main hall, they will have to circle past at least one of the towers. Their descriptions are, at this point, essentially identical.
The broad towers are made of the same weather-darkened stone blocks as the central building. They have no visible entry points on the ground level - not even windows or arrow slits. However, there are what appear to be glass windows set into the the exposed walls - four windows in each segment of the 10-sided structures. Two of these are about 20' (6m) above the ground; another two are 15' (4.5m) higher, just below where the essentially conical roof tiles begin. These windows are set back about 1' (30cm) into the stone walls.
For one-shot purposes, the windows in the towers are shaped like arrow slits; their sills are too sloped, and the windows themselves are too narrow to be used as entry points.
A large stone building with walls reaching almost 30ft (9m) high stands behind the Main Hall. The crumbling remains of a number of chimneys tower higher along the north wall. Alongside the south wall, the collapsed and rotted remains of small wooden structures can be seen - storehouses, perhaps? The damage along the tops of the walls suggest that the entire roof of this structure has caved in.
On the east wall - the wall facing the main building - there appear to be two doorways, one near each corner of the building. There are also two open archways about 15' (4.5m) above the ground, one directly above each of the doors. These achways are opposite a matching pair of openings in the main building's west wall. Remnants of rotting wood debris and rubble of the stone walls themselves lie on the ground between where these passages. It looks as if, long ago, wooden bridges of some kind connected the two buildings. Now, you can see only shadowy darkness when looking into the main building. Looking through the openings in the other building, though, confirms that the roof has indeed collapsed.
The rubble of the collapsed connecting bridges almost completely hides the door at the southeast corner; large chunks of collapsed wall will make accessing that door extremely difficult. The door at the northeast corner is not nearly so impeded.
And if they walk around the Kitchen building to its back/western side...
Walking around the back of the building, you see that more than just the roof has collapsed; 15' (4.5m) of the west wall near the northwest corner is missing as well.
Entry Points From the Outer Grounds
If the party completes the full exploration, they should realize they have several potential entry points into the Academy and/or its kitchens:Possible Entrances to the Kitchens
Possible Entrances to the Academy Halls
Let the party decide how they wish to gain access, then select one of the following links to proceed:
Main Entry Hall
The description and subsequent activity in this room is dependent on how and when the party enters it...If the Party Enters Through the Main Doors...
As you push through the thick sheets of cobweb, your efforts alert the crafters of the obstacle. Looking up in response to the clicking and chitterring sounds you hear coming from above, you see three rather large spiders descending toward you.
If the Party Enters Through the Stained Glass Window...
You're standing on a ledge about a foot wide where the window is inset into the wall. This ledge isn't flat; it arcs upward as it is formed by the curved shape of the window.
As you smash through the colored glass panels, and break the lead frames holding them in place, you realize that they seem to be almost held in place by something inside. Sheets of cobwebs become visible; it's as if the entire window had been webbed over from the inside. But before you can think about this too much, a faint clacking sound along with some high-pitched chittering alerts you to the three rather large spiders traveling along those sheets of webbing and converging on you.
As you smash through the colored glass panels, and break the lead frames holding them in place, you realize that they seem to be almost held in place by something inside. Sheets of cobwebs become visible; it's as if the entire window had been webbed over from the inside. But before you can think about this too much, a faint clacking sound along with some high-pitched chittering alerts you to the three rather large spiders traveling along those sheets of webbing and converging on you.
If the Party Descends from the Observatory Turret Stairs...
You descend the stairs that curl around the inner wall of the turret until you reach the bottom. An open door provids a view of a large hall. Its stone floor is well-worn; a few puddles and bits of moss growing between the flagstones suggest many years of disuse. Colored light streams in from the large round staind glass window you saw from outside the front of the building, but it is diffused by the thick sheets of cobwebs that cover the window inside. These random sheets of webbing cover the partially open front door space; they also partially cover the doorway you're standing in front of.
As you push aside the cobwebs and step into the hall, you see two large, curving staircases to your right leading up to a balcony area, and the open doorway to the outside straight in front of you. But before you can look around further, the faint sounds of clacking and high-pitched chittering warn you of the threat descending from above: three rather large spiders responsible for the webs are responding to your disturbance!
As you push aside the cobwebs and step into the hall, you see two large, curving staircases to your right leading up to a balcony area, and the open doorway to the outside straight in front of you. But before you can look around further, the faint sounds of clacking and high-pitched chittering warn you of the threat descending from above: three rather large spiders responsible for the webs are responding to your disturbance!
If the Party Descends from the Second Floor Balcony...
You find yourselves standing on a balcony of sorts, overlooking what must be the main entry hall of the building. Wide, curved stairways descend from the northwestern and southwestern corners of the space. The light filtering through the huge, round, stained glass window across the open space from you is diminished by the thick sheets of cobweb that are stretched across its entire span. These cobweb sheets extend to the floor below the window, where you can see the main entry doors - one closed and one partly ajar.
The webbing in the window is occupied by three rather large spiders that seem to be simply sitting and waiting for something to disturb their handiwork.
The webbing in the window is occupied by three rather large spiders that seem to be simply sitting and waiting for something to disturb their handiwork.
If entering from either the front door, the stained-glass window, or the turret stairs, the leading members of the party will be attacked by 3 Tangleweb Spiders. The lead party member and one spider should have opportunity for surprise. Otherwise, roll for initiative and conduct the combat. If entering the area from the second floor balcony area, the spiders will only attack if the party descends to the ground floor and (inevitably) disturbs one of the many sheets of webbing stretched all across the space. They will attack if provoked as well.
Once they reach the ground floor of the entry hall and any combat is resolved; the party can look around. (If they are descending from the balcony, but ask to look around first, use some bits of the following narrative as well. (The four coccoons cannot be seen from the balcony stairs.)
Speed: 25ft (7.5m) / Climb: 25ft (7.5m)
STR+0 DEX+2 CON+0 INT-4 WIS0 CHA+2
SP: 4 IS: 2 AP:1
Once they reach the ground floor of the entry hall and any combat is resolved; the party can look around. (If they are descending from the balcony, but ask to look around first, use some bits of the following narrative as well. (The four coccoons cannot be seen from the balcony stairs.)
Tangleweb Spider
Level: 1 Size: Small xp: 40Speed: 25ft (7.5m) / Climb: 25ft (7.5m)
STR+0 DEX+2 CON+0 INT-4 WIS0 CHA+2
SP: 4 IS: 2 AP:1
Melee Attacks: Bite: 1d6+1(piercing)
If Direct Damage done, CON DC12 or Befuddled and Clumsy
If Direct Damage done, CON DC12 or Befuddled and Clumsy
Ranged Attack: Web Sheet (every 3 turns)
Range: 20ft (6m) / 1 target / DEX DC14 or Restrained
Range: 20ft (6m) / 1 target / DEX DC14 or Restrained
Twin grand staircases curve up to an upper level balcony that surrounds the space you're in. The floor is of cut stone, with worn channels that reveal where many, many years of feet once traversed the hall. A few small puddles have accumulated in these worn depressions; occasional drips of water from the roof high above reveal where this water must have come from. Occasional bits of moss grow out of cracks in the stone floor.
Two doors, one in the north wall and one in the south wall, and two arched passages in the corners of the west wall under the balcony lead elsewhere. The north door is closed; the south one is open and the base of a circular stairway can be seen. Decorations in the hall include rusted suits of armor interspersed with stone statues of various Folk - most, but not all dressed in robes. Some are depicted holding tomes. One has arms crossed over chest with two wands in hands; another leans on a staff topped with some ornate decoration.
Hanging just above the floor from the balcony between the staircases are four person-sized coccoons of webbing. But as attention-grabbing as they may be, the things that grab your attention the most are the three discarded shortswords, 2 daggers, and a shortbow that lie scattered on the floor. Four badly shredded leather backpacks lie near the coccoons as well. The weapons do not show the signs of age that everything else in the room exhibit.
The shortsword, shortbow, and dagger are unremarkable and nonmagical, but perfectly functional. They haven't been here long enough to develop any rust. The spiders have long ago dealt with anything edible in the backpacks, but there are still a few items remaining: a Flint & Steel, a whetstone, 6 pieces of chalk, a small, slightly rusted, but safe to use, grappling hook, 6 candles bound with twine, and an item that resembles a thick stick about a foot long with a metal cap slid over one end. This is a Perpetual Torch. There are also many glass shards, as if flasks had broken. In fact, an oily film covers the items in the pack that held the whetstone.
The coccoons hold the dessicated husks of the four adventurers who used to own the weapons and backpack. They're still wearing their bits of leather armor, and one still has a quiver with 12 arrows slung over its shoulder. Each also has a belt pouch containing coins: a total of 17gp, 32sp, and 29cp can be retrieved.
The statues, and all of their component bits (tomes, wands, staff, etc.) are sculpted marble; there is no loot to be had from them, unless the party tries to cart them off whole!
From here, the party can take the , enter the , , , or go up the ornate stairways to the . They can also
Visitor's Reception Room
The door in the north wall near the main entry leads into a three-quarter round room at the base of the north turret. It is approximately 20ft (6m) in diameter. The walls of this room were once paneled in polished hardwood, but these are now cracked and rotting. Moss and a few thin vines have invaded the cracks. Parts of the panels have rotted away completely, showing the stone walls behind them. There is a wooden desk near the far wall that seems to be more or less intact at first glance. Perhaps the wax polish protected the wood somewhat? Behind the desk is a pile of dirt that is now home to a colony of moss and mushrooms.
A close inspection of the desk shows that it is badly rotting, despite its outward appearance. Leaning on it will cause short legs to collapse, and the impact will cause the desk to simply fall apart into rotting pieces. The pile of dirt is the rotted and composted remains of a padded leather and wood chair that the desk occupant once used.A drawer is stuck, but forcing it will reveal eight special items: Visitor's Badges.
Also in the drawer are small placards that include a simple instruction: "To visit Headmaster, step into entry and announce yourself."
From here, the party can only return to the .
Observatory Turret Stairs
The open doorway leads to a set of stairs that circle around the south turret's inner wall rising upward. The center of the tower is a solid pillar of stones, so it is impossible to see what is above, or even how high the stairs lead.
There are cobweb sheets all along the stairs and walls of the turret. 2 Tangleweb Spiders live here, but they're higher up in the tower, and will not respond to disturbances unless the party attempts to go higher than the second floor. The stairs stop at every floor of the main building, opening into halls that run the length of the building's south wall.
The party can either or .
Speed: 25ft (7.5m) / Climb: 25ft (7.5m)
STR+0 DEX+2 CON+0 INT-4 WIS0 CHA+2
SP: 4 IS: 2 AP:1
The party can either or .
Tangleweb Spider
Level: 1 Size: Small xp: 40Speed: 25ft (7.5m) / Climb: 25ft (7.5m)
STR+0 DEX+2 CON+0 INT-4 WIS0 CHA+2
SP: 4 IS: 2 AP:1
Melee Attacks: Bite: 1d6+1(piercing)
If Direct Damage done, CON DC12 or Befuddled and Clumsy
If Direct Damage done, CON DC12 or Befuddled and Clumsy
Ranged Attack: Web Sheet (every 3 turns)
Range: 20ft (6m) / 1 target / DEX DC14 or Restrained
Range: 20ft (6m) / 1 target / DEX DC14 or Restrained
Northern East-West Passage
A solid wall runs along the north side of this passage for 70ft (19.5m). Side passages on the south side wall are at either end of the hall.
From here, the party can either go into the or the . They could also go through the archway to .
Southern East-West Passage
A solid wall runs along the south side of this passage for 70 ft (19.5m). Side passages on the north side wall are at either end of the hall.
From here, the party can either go into the or the . They could also go through the archway to .
North-South Passage Near Hall
This passage connects to both the east-west-passages connected to the Entry Hall. There is a closed, heavy wooden door in the west wall. On the door is a circular bronze plaque, tarnished black with age, but still clearly visible is the raised-relief image of a tongue of flame.
This door leads into the . Otherwise, the party can return to either the or the .
North-South Passage Near West Building Wall
This passage connects to both the east-west-passages connected to the Entry Hall. There is a closed, heavy wooden door in the west wall. On the door is a circular bronze plaque, tarnished black with age, but still clearly visible is the raised-relief image of a bubbling flask.
This door leads into the . Otherwise, the party can return to either the or the .
Evocation Lecture Hall
The door resists, but can be pushed open enough to pass; the scraping sounds of swollen wood along the floor and the creaking of badly rusting hinges make this a noisy operation. Inside, you find what looks like a classroom. The rubble of what used to be perhaps a dozen tables and chairs are arranged facing away from the door. A heavy stone podium, another desk and chair at the far side of the room face the door. The far wall is a large, nearly black expanse; it seems to be made of smooth slate. In the corner to the right of that wall, near the desk, is another door that is also partially ajar.
The podium and blackboard wall are magically linked. If a person stands at the podium and speaks while touching it, a white stick of chalk will appear and begin scratching out whatever is being spoken - complete with the clacking and agonizing screeches of chalk squeaking across the slate - but the clacking and squeaking don't always seem to coincide with the appearance of words and letters on the blackboard. The writing is enchanted as well; everyone who views it will see it written in whatever their "first language" was. True Sight will reveal that the marks are actually some unknown runic language.
If the podium is removed, the magical link between it and the blackboard will be broken. There is nothing else of value in the classroom.
From here, the party can either or attempt to .
Master Spangrove's Quarters
The door between the Evocation Lecture Hall and this room is locked, and the lock mechanism is so frozen with rust that it cannot be picked. But, like most of the original wood in the Academy, rot has weakened the door so that a few good shots with hammers or axes will break it down. Running into it with a shoulder will cause it to break from its hinges and fall in with a shower of splintering fragments of rotting wood. All of these approaches are noisy.
Your guess is that you've entered the living quarters of one of the teachers at the Academy. The room contains what was once a stout wooden desk, though rot has caused two of its legs to collapse, leaving it precariously tilted. Stacks of books and papers apparently tumbled when this happened; there is a small jumbled pile on the desk, and a larger one on the floor next to it. Decay has claimed much, but a few volumes appear to be intact enough to handle.
In the corner next to the small fireplace, a magical circle of some sort is etched into the floor and inlaid with silver. It is about 2' (60cm) across, filled with magical runes around its circumference, and the symbol of a tongue of flame - exactly like the one on the classroom door - is in its center.
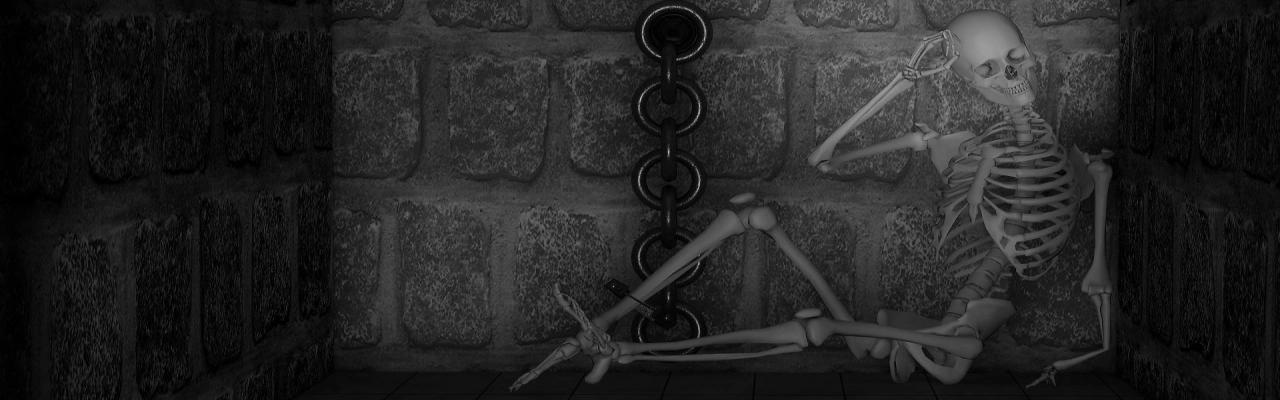
A passage opens to a second room that contains a bed with a nightstand alongside, and a closed iron-strapped chest at its foot. On the opposite wall is a dressing table with a small mirror, and a large wooden armoir.
The bed has collapsed and the mattress and bedclothes rotted, but lying among them is a skeleton dressed in the rotted tatters of what was once a silk robe. The skeleton's arms are folded over its chest, an empty glass vial is visible in the curled fingers of one of its hands. Around the skull is a headband of blue silk with a silver talisman affixed to it. Neither silk nor silver show any sigh of tarnish or decay; though they are covered by the thick layer of dust that blankets everything in this room. Another medallion hangs from a silver chain around the neck of the skeleton, its gold disk pendant beneath the folded hands.
On the nightstand, beneath the dust, is a scrap of parchment with writing on it. Carefully blowing away the dust, you see an archaic form of commonspeech writing; the note reads, "I cannot depart, and I will not join. This is the only way." It is signed, "Donovar Spangrove".
In the corner next to the small fireplace, a magical circle of some sort is etched into the floor and inlaid with silver. It is about 2' (60cm) across, filled with magical runes around its circumference, and the symbol of a tongue of flame - exactly like the one on the classroom door - is in its center.
A passage opens to a second room that contains a bed with a nightstand alongside, and a closed iron-strapped chest at its foot. On the opposite wall is a dressing table with a small mirror, and a large wooden armoir.
The bed has collapsed and the mattress and bedclothes rotted, but lying among them is a skeleton dressed in the rotted tatters of what was once a silk robe. The skeleton's arms are folded over its chest, an empty glass vial is visible in the curled fingers of one of its hands. Around the skull is a headband of blue silk with a silver talisman affixed to it. Neither silk nor silver show any sigh of tarnish or decay; though they are covered by the thick layer of dust that blankets everything in this room. Another medallion hangs from a silver chain around the neck of the skeleton, its gold disk pendant beneath the folded hands.
On the nightstand, beneath the dust, is a scrap of parchment with writing on it. Carefully blowing away the dust, you see an archaic form of commonspeech writing; the note reads, "I cannot depart, and I will not join. This is the only way." It is signed, "Donovar Spangrove".
The silk and silver talisman is a Talisman of Peaceful Repose. The vial in the hands of the skeleton once held a powerful poison, though no traces remain. (This was the suicide poison used by Donovar Spangrove centuries ago.
The gold pendant is about 4" (10cm) in diameter; it bears the same tongue-of-flame symbols that was seen over the classroom door. The pendant radiates magic; this is a Faculty Badge which identifies its wearer as a member of the Academy Staff for purposes of bypassing the many wards and magical protections in the complex.
Opening the chest (after picking the lock), reveals piles of rotted cloth and leather that were once articles of clothing. A cracked leather pouch containing 17gp, 27sp, and 8cp is hidden beneath the clothing piles. The silver coins are tarnished black, and the copper coins have oxidized so badly that they crumble when the coins are emptied from the pouch.
From here, the party can only . A party member possessing the Evocation Faculty Badge can stand on the circle near the fireplace and be instantly teleported to the on the second floor, along with anyone they happen to be touching.
Alchemy Lecture Hall
At the west wall of the building, another north-south passage connects the two running west out of the Entry Hall. In the east wall of this passage is closed wooden door, but a small section of the door - no more than about a foot high and a foot wide - appears to have been roughly chopped through at the floor. The bronze medallion on the door bears the symbol of a bubbling flask.
This is another classroom, with about a dozen rotted tables and chairs facing away from the door and towards the large, blank, black east wall. A stone podium stands facing these, with a single desk and chair off to one side near a partially open doorway in the east wall. A stone block with three shallow steps is immediately behind the podium; apparently its usual user was rather short. There is an extra table just beneath the large slate wall; this table and the floor all around it are covered with thousands of shards of broken glass. There is a thick layer of dust covering everything, but there are also obvious tracks in this dust... tracks of very tiny feet that for the most part travel from the classroom door to the closed door at the front of the room with another small hole chopped through at its base.
This was the Alchemy Lecture Hall. The glassware is what remains of the display of distillers, retorts, condensers, flasks, and other exotic equipment of a skilled alchemist. The podium and slate wall are magically linked (see description of Evocation Lecture Hall). The tracks in the dust are far too tiny to have been made by any of the folk, but they aren't animal tracks either. A character knowledgeable about Fey creatures has a chance to identify them as some sort of small Gremlin tracks, though identifying a particular species of Gremlin is impossible.
There is nothing of value in this room.
From here, the party can either or attempt to
Master Snertblevin's Quarters
The door is locked, and the mechanism rusted shut. The door can be broken down with reasonable effort, though. Alert characters have a slight chance to hear occasional twittering language (Gremlish) of creatures beyond the door as they try to get it open, though they will not get a glimpse of the creatures... yet. If a character speaks Gremlish, they'll be able to make out snippets like, "Somebody coming to play with us!", and "Ooh... they sound big!".
It takes some effort, though not too much to force open the door to the suite of rooms that belonged to another instructor - pretty obviously the Alchemy instructor. Another table littered with glass shards can be seen, though there are some intact pieces of glassware on this one - including a few small, unstoppered flasks containing a yellowish liquid. A badly rotted, very small (halfling or gnome sized) easy chair sits facing the small fireplace
In the corner next to the fireplace, a magical circle of some sort is etched into the floor and inlaid with silver. It is about 2' (60cm) across, filled with magical runes around its circumference, and the symbol of a bubbling flask - exactly like the one on the classroom door - is in its center.
An archway leads to a bedchamber containing a bed no more than 4' (120cm) long. Tendrils of rotted linens adorn the bed, which seems to have collapsed in its center. There is a figure of a gnome lying in the bed - a figure that appears to be made of solid stone, though it is far more detailed than any but the finest sculptures you may have seen. The figure wears silk robes, which are rotted and tattered. A blue silk headband with a silver disk adorns its forehead. A broken bit of silver chain can be seen around the neck of the figure. A nightstand by the bed holds a brass candleholder and the ancient stump of a candle burned almost to its base. An empty glass flask sits atop a scrap of parchment that bears bears writing in the Gnomish language.
The creatures that may have been overheard are 2 Jinkins and 3 Mitflits. They will not stay and fight unless barred from exiting (which would require that the classroom door be closed and the small hole blocked. Initially, they are hidden beneath the desk and bed; they will dash out at their best chance, taking one swipe at any nearby character as they do so.
The yellow liquid in the flasks in the first room is gremlin urine; it has a distinctively foul urine-like aroma. It has no special properties... it's just urine.
On the gnome's forehead is a Talisman of Peaceful Repose. Shattering the petrified gnome will release it. The silver chain once held Master Billwillikin Snertblevin's Faculty Badge, but this has apparently been ripped away. It is now underneath the bed, where one of the Gremlins dropped it. If the party finds this badge, it can be used to teleport between the circle next to the fireplace and the on the second floor.
The parchment reads, "And so I fade as my folk do, though faster than most thanks to my art. I can only pray that the art of Master Adoniel will eensure my lasting peace." It is signed, "Billwillikin Snertblevin, Master of Alchemy".
From here, the party can only .
Speed: 30ft (10m)
ST-2 DX+4 CN+0 IN+2 WS+2 CH+2
SP: 6 IS: 2 AP:2
Speed: 20ft (6m) / Climb: 20ft (6m)
ST-1 DX+3 CN+0 IN+1 WS-1 CH+1
SP: 3 IS: 2 AP:1
The yellow liquid in the flasks in the first room is gremlin urine; it has a distinctively foul urine-like aroma. It has no special properties... it's just urine.
On the gnome's forehead is a Talisman of Peaceful Repose. Shattering the petrified gnome will release it. The silver chain once held Master Billwillikin Snertblevin's Faculty Badge, but this has apparently been ripped away. It is now underneath the bed, where one of the Gremlins dropped it. If the party finds this badge, it can be used to teleport between the circle next to the fireplace and the on the second floor.
The parchment reads, "And so I fade as my folk do, though faster than most thanks to my art. I can only pray that the art of Master Adoniel will eensure my lasting peace." It is signed, "Billwillikin Snertblevin, Master of Alchemy".
From here, the party can only .
Jinkin
Level: 1 Size: Tiny xp: 40Speed: 30ft (10m)
ST-2 DX+4 CN+0 IN+2 WS+2 CH+2
SP: 6 IS: 2 AP:2
Melee Attacks: Dagger: 1d4+4(piercing)
Special Attack: Sneak Attack
Magic: Prestidigitation (at will)
Mitflit
Level: 0 Size: Small xp: 20Speed: 20ft (6m) / Climb: 20ft (6m)
ST-1 DX+3 CN+0 IN+1 WS-1 CH+1
SP: 3 IS: 2 AP:1
Melee Attacks: Dagger: 1d4+3(piercing)
Magic: Speak with Animals (spiders only, at will)
Prestidigitation (at will)
Bane (1/day)
Prestidigitation (at will)
Bane (1/day)
The Balcony
The balcony area overhangs the Entry Hall on three sides - north, west, and south; standing on it places you level with the large, round stained glass window in the Entry Hall. At the two places where the balcony turns, there are long passages leading westward that seem to end in openings in the west wall where daylight is streaming in. A side passage can be seen right where these openings are. Two huge, iron-strapped wooden doors are set in the center west wall. There are two smaller, less ornate doors, one in each of the balcony's two "legs" right where they end at the building's east/front wall; these should lead into the two corner turrets.
From here, the party can use the small doors to enter the on the north side, or the . They could use the large doors to enter the , or they could take either the or .Northern East-West Passage (Floor 2)
This passage runs about 70ft (19.5m) from the balcony at its eastern end to a large opening to the outside at its western end. This opening appears to be paired to a similar one in the wall of the Kitchen building across an open space. The ground beneath that space is littered with the rotted wooden debris of what was apparenly a bridge of sorts connecting the buildings. Also at the western end, there is another passage that leats to the south.
From here, the party can either go to the , or attempt to enter the . Alternatively, they could use the opening to return to the .
Southern East-West Passage (Floor 2)
This passage runs about 70ft (19.5m) from the balcony at its eastern end to a large opening to the outside at its western end. This opening appears to be paired to a similar one in the wall of the Kitchen building across an open space. The ground beneath that space is littered with the rotted wooden debris of what was apparenly a bridge of sorts connecting the buildings. Also at the western end, there is another passage that leats to the north.
From here, the party can either go to the , or attempt to enter the . Alternatively, they could use the opening to return to the .
Faculty-Only Passage (Floor 2)
If the party attempts to enter this passage from either the northern or southern east-west passages, and if they do not possess a Faculty Badge, or are being touched by somebody who does...
As you attempt to enter the passage, you smack into an invisible barrier of some sort. You can see into the passage; which, like the rest of this place is dust-covered, but one thing you immediately notice is the lack of cobwebs. You also see tracks in the dust... many sets of tiny tracks that seem to lead to one spot along the west wall about halfway down the corridor before they vanish.
If the party enters via either door in the Gathering Hall, or if they have Faculty Badges and enter from the passages...
This corridor connects with the two east-west passages right at the spots where those end in west-wall openings to the outside. There are two distinct sets of tracks that seem to be coming and going from a spot near the middle of the passage. Examining that spot, you see etchings and silver inlays in the floor there - a circle of some kind with lots of runes around its edge, and the symbol of a bubbling flask in its center.
If the party brushes the dust around, they will find the entire corridor lined with these magical circles - one for each magical discipline, and another for the headmaster. These are Teleportation Circles which are keyed to Faculty Badges. If one possesses a badge and steps onto the appropriate circle, they will be instantly teleported to a similar circle in that faculty member's quarters (and vice versa). The circles "reset" in 30 seconds, so if one simply stands still at the destination, they will teleport back again.
From here, the party could use the doors to enter the , or they could enter either the or . Alternatively, if they have the appropriate Faculty Badges, they could teleport to either or .
Gathering Hall
The doors to the hall are not locked or barred, but they are stuck shut, and the hinges are quite rusty. It will take some effort to get one or both pushed open. There is a small chance the hinges will fail, causing a door to crash to the ground loudly, with the echo resounding for a moment or two.
You finally get the doors open and yous ee alarge hall, about 40ft (12m) wide and 60ft (18m) long. The stone floor is cracked and worn. A few tattered remnants hanging from the walls suggest that banners or tapestries once hung there, but these have long ago rotted awa. About 45ft (16.5m) from you, a step rises, and the floor beyond is a bit higher than that in most of the hall. Along the walls are the remains of long wooden tables and benches. Many have rotted apart and lie in rubble. Some have partially collapsed. A handful still look intact, but are not in any usable shape. Traces and sheets of cobwebs are everywhere.
The long table occupying the raised floor appears to be in much better shape. It is much more heavily constructed, and on it you see four large candleabra, each holding stumps of three candles. Though covered with cobwebs that seem almost to be binding them to the table, the unmistakeable glint of pure, untarninshed gold shines out from these.
There are two doors in the west wall; one in each corner.
The candlestands are quite large and bulky, but they can be sold in the camp for 75gp each.The long table occupying the raised floor appears to be in much better shape. It is much more heavily constructed, and on it you see four large candleabra, each holding stumps of three candles. Though covered with cobwebs that seem almost to be binding them to the table, the unmistakeable glint of pure, untarninshed gold shines out from these.
There are two doors in the west wall; one in each corner.
From here, the party can return to the , or they can use either door to enter the (even if they do not possess any faculty badges).
Custodian's Closet
Forcing open the door, you enter a three-quarter-round room about 20ft (6m) in diameters. The walls are the unadorned stone walls of the turret structure. Rusted metal brackets show where shelves were once set into the walls, but these have rotted and fallen to decompose on the floor. The space all around is littered with rusted and rotting remnants of buckets, brooms, and mops. Shards of pottery and glass lie amid the debris from fallen shelves. Also in the jumbled debris is a small wooden chest that appears to be intact. It has a brasss lock mechanism that does not seem to have been destroyed by the passage of time.
This is the Academy Custodian's closet, used to house various cleaning and repair implements required of that profession. The small chest contains a number of keys made of an alloy that apparently resisted rust or tarnish; they are all in quite good shape. They do not emit any sort of magical auras. The chest itself is locked, but the lock can be picked normally. Alternatively, a solid blow to the chest will break it open. (The keys do not open anything in the one-shot area, but they are needed to access portions of the restricted section in the library, as well as various rooms in the lower levels of the Academy.)
From here, the party can only return to the
Observatory Turret Stairway (Floor 2)
The door opens onto a landing, with stairs spiraling downward to the left and upward to the right. Cobwebs are everywhere.
From here, the party can descend to the , or ascend . They can also return to the .
Third Floor
Observatory Turret Stairway (Floor 3)
You're on another landing, with stairs spiraling downward to the left and upward to the right, and a doorway leading west. Cobwebs are everywhere. In fact, they're thick enough going further up the stairs as to make the area impassable.
From here, the party can descend to the , or .
Southern East-West Passage (Third Floor)
You are in a 10ft (3m) wide corridor that seems to run the length of the building from east to west. A doorway marks the eastern end. There is a side passage leading north about 40' (12m) from the east end of the passage, directly opposite a double wooden door in the south wall. Another passasge, also leading north, is at the far western end of the corridor. The double doorway has had timbers nailed across it to keep the doors closed. Though the timbers are as old as the place, the nails seem to be much newer; they show very little rust at all.
The doorway is to the observatory turret; if the party just entered from there, this should be clarified. The double doors lead to the dormitory common area, where a nasty, level 2 encounter awaits. There are five Everburning Torches - along the south wall providing dim light: one halfway between the turret door and the dormitory doors; a pair flanking the dormitory doors, one about 35' beyond the doors, and one at the west end of the corridor.
From here, the party can at the east end of the corridor, take the or use the .
Northern East-West Passage (Third Floor)
You are in a 10ft (3m) wide corridor that seems to run the length of the building from east to west. A doorway marks the eastern end. There is a side passage leading south about 70' (12m) from the east end of the passage, directly opposite a double wooden door in the nouth wall. Another passasge, also leading sorth, is at the far western end of the corridor. A brass plaque on one of the double doors bears the word "Library". A similar plaque on the other door reads, "Students, Faculty, and Authorized Visitors Only".
From here, the party can at the east end of the passage, use to the or select the .
Headmaster's Passage
This is a corridor connecting two east-west passages. In the center of its western wall is a small semi-circular alcove.
One Everburning Torch lights the passage; it is on the east wall opposite the alcove. From here, the party can enter the , or the . Alternatively, they can examine the .
Classroom Passage (Third Floor)
This is a corridor connecting two east-west passages. Near the southern end, a wooden door in the east wall bears a plaque containing a symbol that resembles a shield. This door is slightly ajar, and a hole about 1ft (30cm) high and just as wide seems to have been chopped or chewed through it at its bottom.
One Everburning Torch lights the passage; it is halfway down the corridor on the west wall. From here, the party can enter the , or the . Alternatively, they can .
Headmaster's Entry
Set into the wall of the corridor is a circular alcove covered in wood paneling that is untouched by the rot pervading everywhere else in this place. A brass plate on the curved wall reads "Headmaster's Office - Identify Yourself". A circular mosaic tile patter covers the floor of the alcove, which is only large enough for one person to stand in.
If a person steps into the alcove while possessing a Visitor's Badge, Student Badge, or a Faculty Badge, and speak their name, the space will spin 180 degrees and deposit the person into the Headmaster's Office. Anyone else outside will see the alcove spin. The new wall that faces them will have a plaque that reads, "Knock for Access". (If the first person is still standing in the alcove on the office side, they will be spun back to the corridor.)Once the alcove has spun around, a character can explore the . If they stay in the alcove and somebody else knocks from outside, or if they knock on the wall themselves, they'll spin back to the .
Headmaster's Office
This is a spacious room that is covered by centuries of dust, some of which was kicked up into a cloud by the spinning of the alcove entryway. A large desk dominates the center of the room. Dust and cobwebs cover the two badly rotted chairs which face the desk. Another large, padded chair behind the desk appears to have been covered in some sort of scaled hide; it looks reasonably well intact.
The walls are covered by paintings - fourteen portraits of Folk of all races. All are middle-aged or elderly; all wear intricately embroidered robes with all sorts of patterns and runes. All wear the same pendant, a silver-colored disc bearing the image of a building flanked by two turrets.
Two glass globes sitting atop brass stands are on either corner of the desk. These flicker and glow with a very faint light. There are two skulls on the desk as well - one human and one Taxlatl (birdfolk these appear to have been converted into bowls. A pen and ink stand with three quills is between the skulls.
Behind the desk, an archway leads into another room that seems to be filled with bookshelves.
A Perception check will allow somebody to remember seeing an identical copy of one of these portraits in the Visitor's Reception area (if they visited there). The globes contain pebbles that had Continual Light cast upon them centuries ago. The magic is fading, but not gone completely. The skulls are unremarkable. The inkwell contains nothing but solid residue; the quills crumble to dust when touched. The portraits are of the various headmasters of the Academy during its history.
The desk contains a drawer in which 12 Student Talismans can be found.
From here one can either return to the or explore the .
Headmaster's Study
This is a room whose walls are lined floor-to-ceiling with bookshelves. A desk sits in the center of the room; apart from the thick layer of dust and cobwebs covering its surface, it appears to be in a remarkable state of preservation. There are no signs of rot or decay on the desk itslef. Something resembling a brass candlestand about 18in (45cm) tall stands on one corner of the desk. Atop it, a small globe of frosted glass flickers and faintly glows - at least the bottom half glows; the top half is thickly dust-covered.
There are countless books of all shapes and sizes on the shelves; all covered with dust and cobwebs. But the shelves are not filled; in fact it looks as if whole sections of the library have been removed, leaving clusters of books separated by wide gaps. The books themselves show signs of advanced age and decay; they look as if they'd simply crumble if disturbed.
Opposite the archway to the front office is another closed wooden door.
Perusing the titles of the books, adventures will find many scripts and languages they do not understand, thoush some are in commonspeech. Others are in Elvish, Dwarvish, Awkwan (birdfolk), and even Taxlatl (lizardfolk). A few are in a script that has been lost to the ages.
The gaps between the books are haphazard and do not appear to be a "decorating decision". It's as if a number of books were removed, leaving others behind. Anyone with formal magical training can make a Perception check to notice that while all sorts of magical subjects are covered by the books remaining, there are no titles related to necromancy, and very few or summoning.
There is one book that faintly radiates a magical aura, and its is far better preserved than all the others, though the layers of dust and cobwebs will initially hide that fact. Even this book has been damaged in the past by bookworms, but it appers to have been a spellbook, and one spell: Thoughtful Gift remains intact.
From here adventures can return to the , or proceed through the door to the .
Headmaster's Quarters
This is a spacious room dominated by a large bed against one wall, with small tables on either side. The thick layer of dust and sheets of cobwebs make it clear that nothing has been touched in this room for many, many years. The nightstands hold badly tarnished candlestands, each with a partially burned wax candle stub. The bed appears to be made up, but there is nothing atop it other than dust.
Opposite the bed is a large wooden dressing cabinet, and next to that a small dressing table and chair.Shards of broken mirror litter the top of the dressing table and the area around the chair. There are - or at least were - carpets covering the floor here; what's left of them beneath the dust is too badly rotted to be salvageable.
There is a door on the far wall, it stands ajar. Beyond it is a space no more than 3ft (1m) square - the private garderobe for the occupant of this suite.
The wardrobe contains the rotted and tattered remains of a number of fine silk robes, some with embroideries of gold and silver thread in intricate patterns - much like those in the office portraits. None are salvageable, though. The dressing table is bare except for the shards of broken mirror. The blankets and bedsheets were also quite lavish in their time, but are now rotted and riddled with insect holes (once the dust is removed).
The garderobe (toilet) features a rotting wooden seating platform with a hole in it. The space below the hole radiates magic, and shining a light into the hole reveals only pitch blackness. This is a still-active portal to a pocket dimension that served as the refuse dump for the Academy; anything dropped into it will simply disappear without a sound.
From here, adventurers can only return to the
Southern Turret Stairway (Third Floor)
You are on a landing in the turret stairway; steps lead upward or downward. However, the cobwebs in the stairway passage leading upward are so thick that they seem impenetrable.
Until upper floors (intended for Level 2+ characters) are completed, assume the stairway up to be impassible.From here, the party can or .
Northern Turrert Stairway (Third Floor)
You are on a landing in the turret stairway; steps lead upward or downward. However, the cobwebs in the stairway passage leading upward are so thick that they seem impenetrable.
Until upper floors (intended for Level 2+ characters) are completed, assume the stairway up to be impassible.From here, the party can or .
Abjuration Lecture Hall
The damaged door opens into another classroom or lecture hall. Remains of student desks and chairs face away from the door and toward the east wall, which is an expanse of black slate. Before the slate wall is a podium, and off to one side is one more desk and chair. Near that is a door in the east wall, with another small hole broken through it at the bottom.
The other three walls of the room are decorated with all sorts of shields hung on them. Large and small, kite-shaped, rectangular, and round, wooden and metallic; they are of all varieties. Some have bits of old paint showing they were emblazoned with shapes and symbols. There are also a few gaps where shields may once have hung; on the floor beneath mosts of these, the broken, rotted, and rusted remains of the shields can be seen.
There is one shield high up on one wall that, though covered with cobwebs, does not seem to have been affected by age. Made of metal with no signs of rust, it bears what looks like a family crest on it.
This was the Abjuration Lecture Hall, dedicated to the study of defensive magic. The good-condition shield on the wall is magical; it is a Medium Shield+1. The family crest on the shield is actually that of Marquis Spikeberry, who will pay handsomely for this artifact.
From here adventurers can return to the , or can enter
Master Adoniel's Quarters
As you approach the door, you hear quiet, high-pitched voices coming from the other side, interspersed with "hush"ing sounts. You cannot make out what they are saying. The door itself is closed, but not locked.
The room itself is decorated differently from others you've encountered so far. The desk and chair are in the front room as always, but there are several clay pots along the walls, and the ceiling is dotted with tiny points of magically generated light.
The room itself is decorated differently from others you've encountered so far. The desk and chair are in the front room as always, but there are several clay pots along the walls, and the ceiling is dotted with tiny points of magically generated light.
These are the same Gremlins that appeared on the first floor in Master Snertblevin's Quarters. Thus, if any of the gremlins were dispatched there, they will not be present here! The Gamemaster should be prepared to make on-they-fly adjustments as appropriate.
Anyone that listens carefully, and who speaks Gremlish, will make out "hide behind there", and "be quiet, you turd". When the party opens the door and enters, the gremlins will all be hidden, but as soon as the second party member enters, they will attack. Tactics are to dash in, stab with their tiny swords, and dash away, using the clay pots and desk for cover. Any that take more than half their hit points in a single strike will attempt to flee the room if they can.
From here the party can only .
Speed: 30ft (10m)
ST-2 DX+4 CN+0 IN+2 WS+2 CH+2
SP: 6 IS: 2 AP:2
Speed: 20ft (6m) / Climb: 20ft (6m)
ST-1 DX+3 CN+0 IN+1 WS-1 CH+1
SP: 3 IS: 2 AP:1
Anyone that listens carefully, and who speaks Gremlish, will make out "hide behind there", and "be quiet, you turd". When the party opens the door and enters, the gremlins will all be hidden, but as soon as the second party member enters, they will attack. Tactics are to dash in, stab with their tiny swords, and dash away, using the clay pots and desk for cover. Any that take more than half their hit points in a single strike will attempt to flee the room if they can.
From here the party can only .
Jinkin
Level: 1 Size: Tiny xp: 40Speed: 30ft (10m)
ST-2 DX+4 CN+0 IN+2 WS+2 CH+2
SP: 6 IS: 2 AP:2
Melee Attacks: Dagger: 1d4+4(piercing)
Special Attack: Sneak Attack
Magic: Prestidigitation (at will)
Mitflit
Level: 0 Size: Small xp: 20Speed: 20ft (6m) / Climb: 20ft (6m)
ST-1 DX+3 CN+0 IN+1 WS-1 CH+1
SP: 3 IS: 2 AP:1
Melee Attacks: Dagger: 1d4+3(piercing)
Magic: Speak with Animals (spiders only, at will)
Prestidigitation (at will)
Bane (1/day)
Prestidigitation (at will)
Bane (1/day)
The Kitchens
The kitchens, pantries, larders, and other storage facilities of the Forgotten Academy were housed in a building of their own that backed onto the Main Hall. The main stone building is three stories tall, with a flat that was once supported by heavy beam trusses that occupied most of the upper half of the room.
A large stone building with walls reaching almost 30ft high stands behind the Main Hall. It shows the crumbling remains of a number of chimneys. On both sides of the building, the collapsed and rotted remains of wooden structures can be seen - with mortises in the cut stone revealing where roof timbers were once affixed. There are two open archways in the second story of the wall facing the Main Hall - opposite a matching pair of archways in the Main Hall's back wall. Some few remnants of rotting wood debris on the ground between where these passages ran suggest that long ago, bridges of some kind connected the two buildings above.
The main kitchen of the Academy is a relatively large space where staff prepared meals for the entire academy community. Ovens and roasting hearths lined the walls, and work tables filled much of the central part of the room. There are cellars beneath the floor that were used to store foodstuffs. A number of smaller wooden structures were once attached to the building's sides for storage as well, but these have long since rotted away.
The presence of a great deal of food at the time when catastrophe befell the Academy attracted wildlife. Though that original food supply is long gone, the room continues to be the lairing area for a colony of Giant Badgers.
Main Kitchen
If the party approaches the kitchen from the space between it and the Main Hall...
Even before opening the door to this room, the odor of wild animals can be detected. Judging from the strength of the odor, this building is now the home of either large or numerous creatures. Forcing the door open, the first thing you are aware of is the fact that the ceiling of the building has almost completely collapsed. Rotting sections of huge timbers and broken slabs of stone litter the floor of the room. A section of the wall opposite you, near one corner, has also collapsed. The intact portion of that wall has a number of large hearths and stone ovens along it, each with chimneys reaching skyward. Stone work tables lining the two side walls walls. Shattered and rotting debris of stairways along the wall you are entering through lead up to the open archways you saw from outside. Piles of debris made up of rotted wood remnants, compost, and animal dung litter the floor.
Your appearance has apparently disturbed the current inhabitants - two huge grey, black, and white heads lift and snap toward you. These creatures have features that resemble common badgers - except that they are many times larger - glare at you and growl/hiss a stern warning.
Your appearance has apparently disturbed the current inhabitants - two huge grey, black, and white heads lift and snap toward you. These creatures have features that resemble common badgers - except that they are many times larger - glare at you and growl/hiss a stern warning.
If the party circles around to the back of the kitchen building...
As you reach the back of the building, you see that near the far corner, a portion of the wall appears to have collapsed. As you get nearer to this breach, the odor of wild animals can be detected. Judging from the strength of the odor, this building is now the home to either large or numerous creatures. Reaching the breach in the wall and peering around and into the room, see a space littered with the stone debris of a ceiling that has almost completely collapsed. Some bits of massive rotted timbers are amid the stone fragments. Stone work tables lining the two side walls walls. On the wall opposite you, two open archways can be seen in the upper portion of the wall which faces the Main Hall building, with crumbling bits of wooden stair structures leading to them. In addition to the roof debris, larger piles of rotted wood remnants, compost, and animal dung litter the floor.
Your appearance has apparently disturbed the current inhabitants - two huge heads lift and snap toward you. These creatures with features that resemble common badgers - except that they are many times larger - glare at you and growl/hiss a stern warning.
Your appearance has apparently disturbed the current inhabitants - two huge heads lift and snap toward you. These creatures with features that resemble common badgers - except that they are many times larger - glare at you and growl/hiss a stern warning.
The two Giant Badgers will attack if the party enters the kitchen interior; they will easily leap over the tables and debris that may be in their way. They will fight until reduced to half their health; at that point, they will squeal and attempt to escape via the hole in the west wall corner, disappearing into the forest.
The party can either or descend into the
Speed: 30ft (10m) / Burrow: 10ft (35m)
ST+1 DX+1 CN+0 IN-2 WS+0 CH+2
SP: 6 IS: 2 AP:1
The party can either or descend into the
Giant Badger
Level: 1 Size: Medium xp: 40Speed: 30ft (10m) / Burrow: 10ft (35m)
ST+1 DX+1 CN+0 IN-2 WS+0 CH+2
SP: 6 IS: 2 AP:1
Melee Attacks: Bite: 1d6+1(piercing) / Claw: 1d6+1(slashing)
Special Attack: Protective Mother
If defending young, gain additional attack per turn
If defending young, gain additional attack per turn
Kitchen Cellars
A rubble-strewn stone stairway spirals down, leading into a corridor. There are four openings in the corridor walls, two to the right and two to the left. Each with rotted debris that suggests doors once stood in each of the openings. An unpleasant smell in the air suggests that wildlife may be present. A high-pitched but faint mewling sound suggests that wildlife may involve newly born young. Those sounds seem to be coming from one of the two farther doorways.
Unless the party makes a lot of threatening sounding noise, they will not be attacked in the hallway, though they may begin to hear additional sounds of hissing and low-pitched growling.
From this hall, the party can either , or enter , , , or .
Kitchen Cellar 1
This room is strewn with various organic debris. The rotted remains of dried grasses and other vegetation, and some very old dried dung piles - some rather large - suggest it was once inhabited by wildlife, but there are no fresh signs. Stone shelves along the back walls are bare except for broken shards of clay storage vessels, though one or two jars seem to be intact. Many more clay shards litter the floor beneath the shelves.
The intact jars hold dried herbs, though they show signs of mold now.From here, the party can only .
Kitchen Cellar 2
This room is strewn with various organic debris. The rotted remains of dried grasses and other vegetation arranged like bedding suggest animals once lived here. The dried dung piles suggest they were large. But it hasn't been used in at least a season or two. Stone shelves along the back walls hold a few clay storage jars; the shards on the floor indicate there used to be many more of these.
The intact jars hold dried herbs, though they show signs of mold now.From here, the party can only .
Kitchen Cellar 3
Rotting straw and vegetation, and a dung pile in the corner indicate this room was once used as a den for wildlife. There are no shelves in this room, but there are larger pottery shards. Likely these were large floor-standing vessels. Heavily rusted strips of circular iron banding suggest there were probably barrels here long ago as well.
There are no traces remaining to suggest what the clay jars or barrels once held.
From here, the party can only .
Kitchen Cellar 4
As you step into the entry, you quickly spy a room that looks like the others down here - except for the large, grey-furred creature - about the size of large bear, but with distinct black and white markings on its head and face. As it bares its teeth releases a hissing growl, you also see four young, each about the size of a large cat. Mother creature is not happy; she begins to charge.
This room contains a mother Giant Badger and four kits. She will defend her kits to the death. If the party chooses to flee, she will pursue only to the bottom of the cellar steps. The kits will not attack, but will claw, scratch and bite anyone who tries to handle them.
From here, the party can only .
Speed: 30ft (10m) / Burrow: 10ft (35m)
ST+1 DX+1 CN+0 IN-2 WS+0 CH+2
SP: 6 IS: 2 AP:1
Speed: 25ft (7.5m) / Burrow: 5ft (1.5m)
ST+0 DX-1 CN+0 IN-2 WS+0 CH+0
SP: 3 IS: 2 AP:-1
From here, the party can only .
Giant Badger
Level: 1 Size: Medium xp: 40Speed: 30ft (10m) / Burrow: 10ft (35m)
ST+1 DX+1 CN+0 IN-2 WS+0 CH+2
SP: 6 IS: 2 AP:1
Melee Attacks: Bite: 1d6+1(piercing) / Claw: 1d6+1(slashing)
Special Attack: Protective Mother
If defending young, gain additional attack per turn
If defending young, gain additional attack per turn
Giant Badger Kit
Level: 0 Size: Small xp: 20Speed: 25ft (7.5m) / Burrow: 5ft (1.5m)
ST+0 DX-1 CN+0 IN-2 WS+0 CH+0
SP: 3 IS: 2 AP:-1
Melee Attacks: Bite: 1d4 (piercing) / Claw: 1d4 (slashing)
Entry for Adventure April 2023


Regional maps prepared using Inkarnate
Battle maps prepared using DungeonFog
(with many map assets courtesy of Caeora)
Artwork designated as being from Pixabay is governed by
Pixabay License
copyright© 2020, 2021, 2022, 2023, 2024, 2025 Robert O'Brien
Game Rules described herein are governed by
Open Game License version 1.0a
Descriptions of the World of Cartyrion, including, but not limited to its cosmology, deities, geography, political structures, religious sects, regional names, villages, towns, cities, and characters, are governed by Non-Commercial, Share-alike Creative Commonse License
I.... I didn't even think of trying to combine Adventure April with Dungeon23. Great idea, and amazing job.
Thanks! I didn't submit this for the "official" Play May consideration because it and my new Laurels & Loot rules are not playtested yet, but I *am* planning on doing some livestream playtests this month. Stay tuned! And thanks as always for taking the time to leave a comment!
The Perseus Arm - A new, alternative setting for fans of Traveller in any of its variations.
Laurels & Loot is a new, lightweight TTRPG rules system that hearkens back to the early days.